User Guide
EduMate User Guide
Are you a busy NUS student who wants to efficiently manage your academic and social life?
We acknowledge that for brilliant individuals like yourself, the time you spend in university presents an opportunity to connect with others and establish long-lasting friendships. We have built this personalised desktop app to help YOU do just that!
Using this Guide
If you are new to this user guide, we strongly recommend you to read the Overview section. Otherwise,
- If you want to run EduMate for the first time, check out our Quick Start guide.
- If you want to learn to use EduMate, check out our Commands section for a detailed guide.
- If you want a more hands-on learning experience with EduMate, check out our Try-it-out section.
- If you want to contribute to this project, check out our Developer Guide.
For experienced users, you may refer to the Command Summary for a summarised table of all the commands available.
Table of Contents
- Using this Guide
- Table of Contents
- Overview
- Quick Start
- User Interface
- Set Your Own Profile
- Commands
- Advanced Commands
- Other Commands
- FAQ
- Summary
- Troubleshooting
Overview
The following subsections explain the overarching functionality of EduMate, as well as the various terminology we will use in this guide.
What is EduMate?
EduMate is a desktop app designed for NUS students to manage their academic and social lives. It works as an address book but has other interesting features as well. It works mostly by commands and can behave like a Command Line Interface (CLI).
Understanding the Symbols
Here is a breakdown of the different symbols and colours we will use throughout this guide.
Glossary
- Command Line Interface (CLI): A text-based user interface (UI) used to run programs, manage computer files and interact with the computer
- Graphical User Interface (GUI): A form of user interface that allows users to interact with electronic devices through graphical icons
- OS: Operating System
- Mainstream OS: Windows, Linux, Unix, OS-X
- Mass Rapid Transit (MRT): Singapore’s high-speed rail system.
- Co-Curricular Activities (CCA): Another name for extra-curricular activities.
- NUS: National University of Singapore
Quick start
System Requirements
Here is everything you need to install and set up EduMate. For the best possible experience, we recommend that you run the application on the following supported operating systems:
- Windows
- macOS (Both Intel and M1/M2 Chips)
- Linux
Do also ensure that you have Java 11 or above installed in your Computer. If you don’t already have Java 11 or above on your system, head over to Oracle’s Java download page.
For users who are using MacBooks with M1 or M2 chips, you might want to head over to Azul Open JDK download page to download Java 11.
To check whether your Java version is compatible with EduMate, please refer to How To Check Your Java Version.
Installation Instructions
Step 1. Download the latest edumate.jar from here.
Step 2. Copy the file to the folder you want to use as the home folder for your EduMate.
Step 3. Open a command terminal, change directory into the folder where you put the jar file in via the command cd, and use the java -jar edumate.jar command to run the application.
After a few seconds, a GUI resembling the one shown below will appear. Please take note that the application already includes some sample data.
EduMate will create a
data folder which contains the data saved by EduMate. It is essential that you do not modify the contents
of the data folder so as not to corrupt your data and result in an empty application by default.
Try it out! (Recommended)
Ensure you have met the system requirements and installed EduMate properly on a computer. If you have not, please see System Requirements and Installation Instructions before continuing.
Before we dive into exploring the various features of EduMate, please choose whether you prefer a guided or unguided experience.
- For a guided experience, please enter
sample 100in the command box located at the top left of the application. This will generate 100 sample contacts in your EduMate, which you can use to familiarise yourself with the application’s functionalities. - If you would like to start with a fresh EduMate, simply type
clearin the same Command Box located at the bottom of the application.
clear or sample warnings Performing either action will remove any contacts you currently have on your EduMate. To save your progress, have a look at our Save Command.
As you navigate through the application, we encourage you to experiment with different commands to further enhance your understanding.
Getting help
If you require assistance while using EduMate, you may find the solution in the Commands section of this User Guide. Alternatively, you can type in the help command to access a quick reference guide.
If you need more assistance, do not hesitate to head over to our Github page and file an issue with a tag customer-assistance-required. A member of our core team will attend to you as soon as possible.
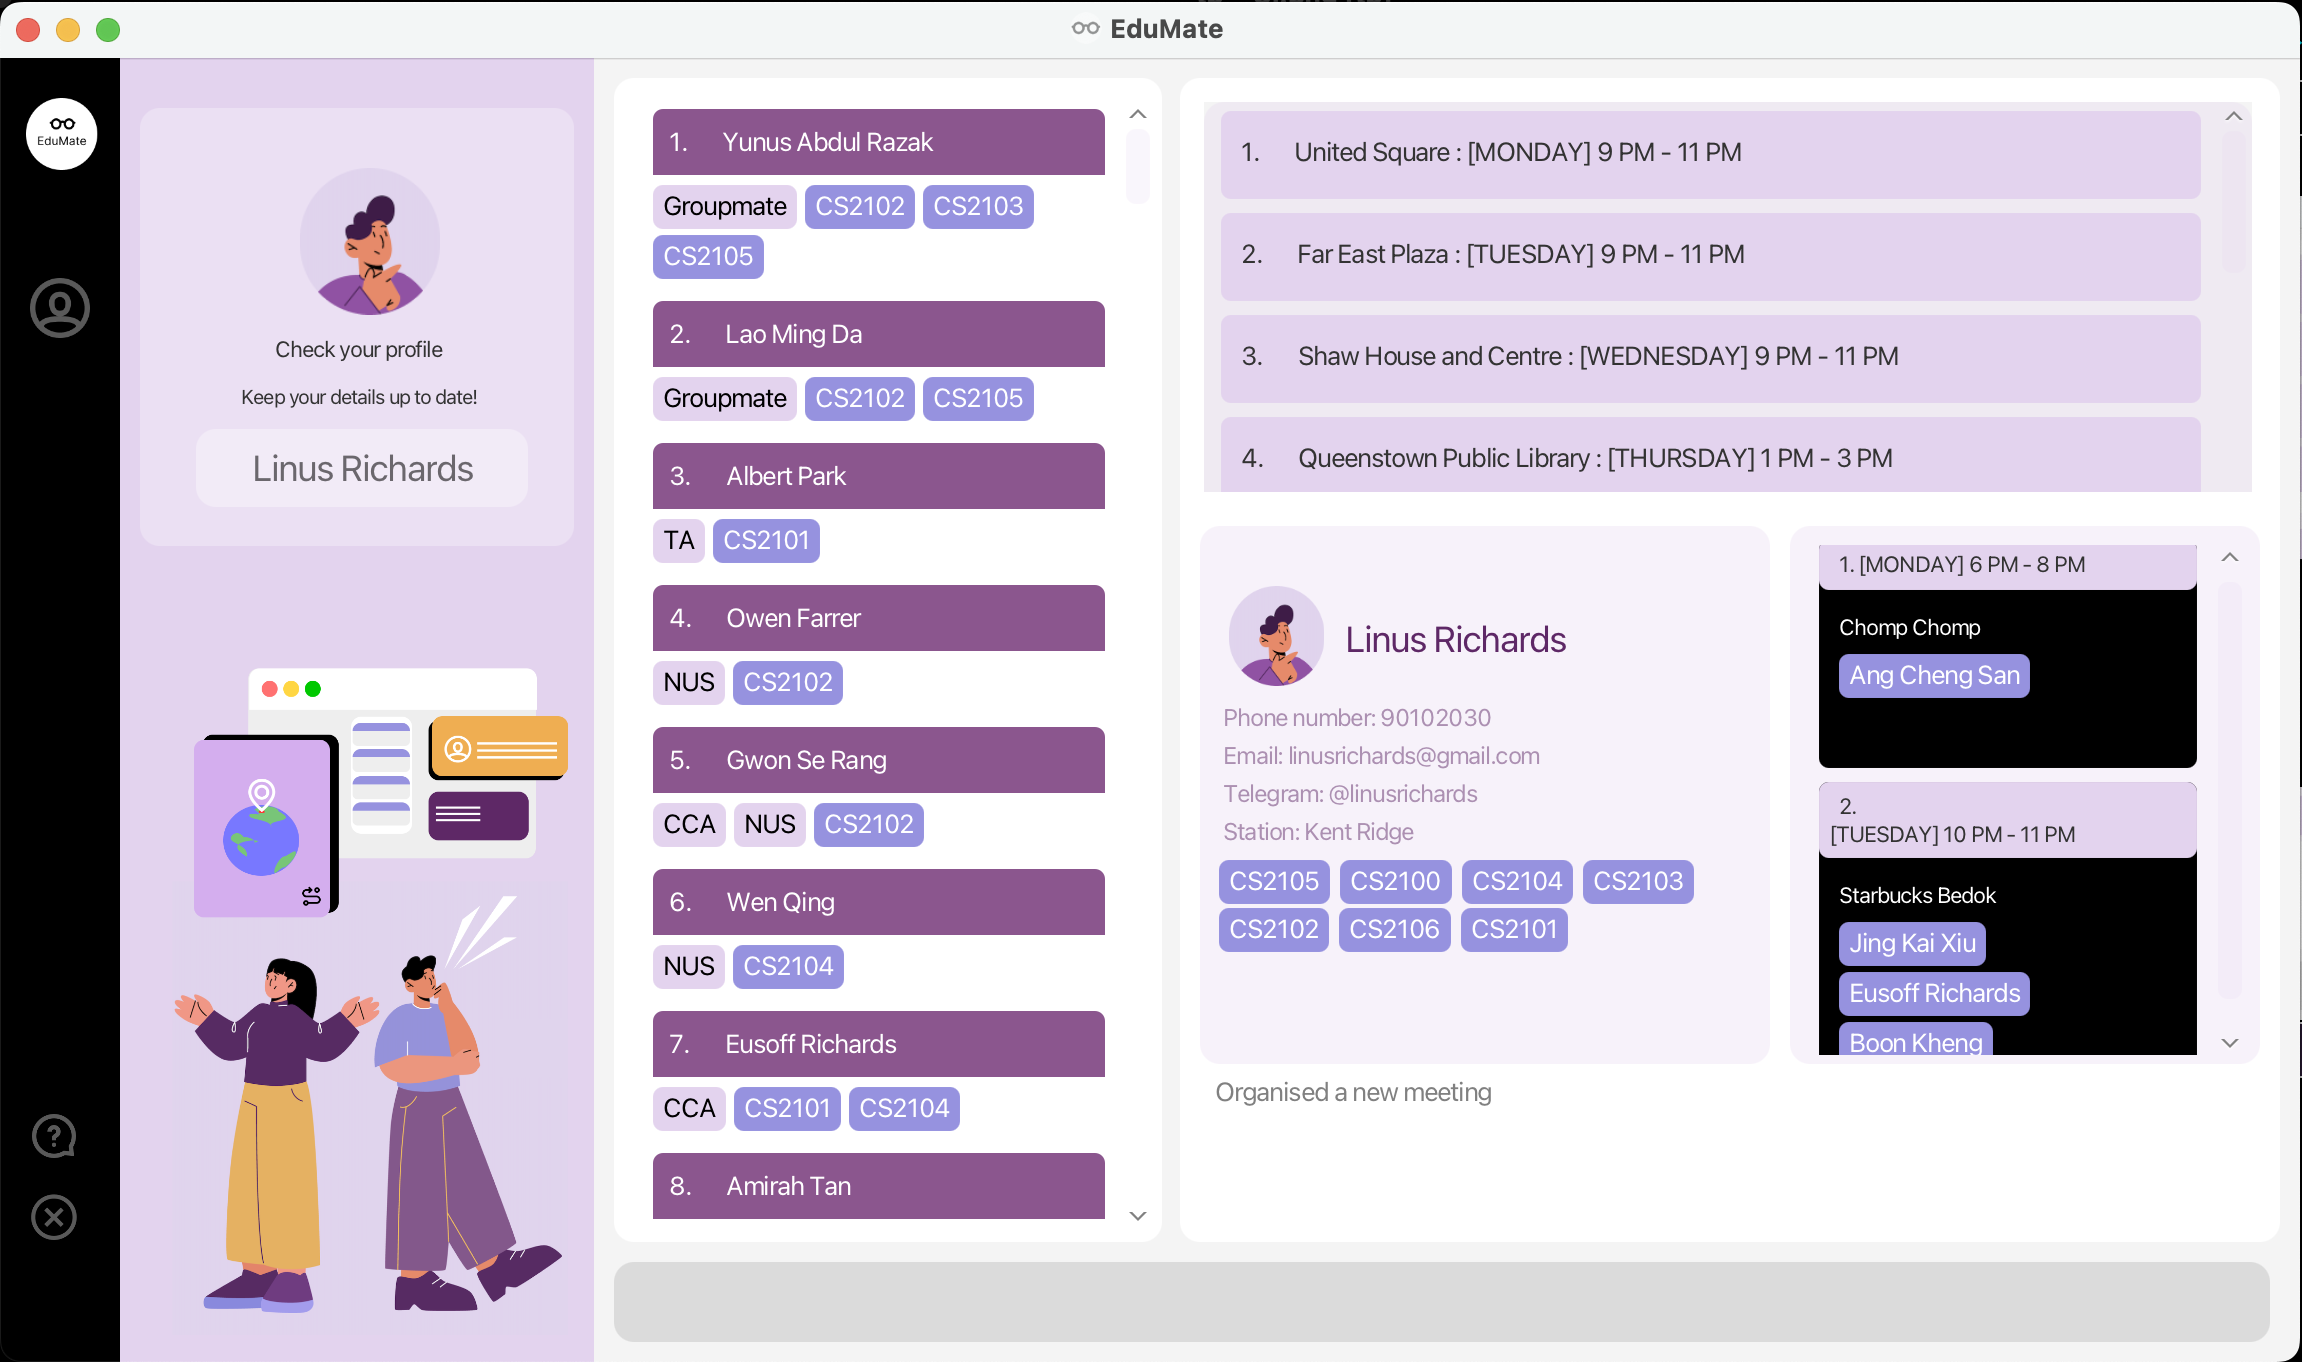
User Interface
Our UI components have been carefully crafted to fulfil specific functions, ensuring that your experience using our platform is as seamless and user-friendly as possible.
We have chosen a light purple and white colour scheme for the application, as these cool colours promote a sense of calm and clarity, making it easier for you to focus on your work.

Breakdown of EduMate’s UI
EduMate consists of the following main UI components
- Person List
- Meet Up Recommendation Panel
- Profile Panel
- Scheduled Meet Up Panel
- Command Response Box
- Command Box
- Help Button
- Exit Button
The following diagram shows the layout of components numbered exactly as above.

Person List
You may locate the Person List at the center-left of EduMate. This is where you will see all your saved contacts (or sample data if you are trying out for the first time).
When viewing your contacts in EduMate, you will notice an index assigned to each contact. This index is located directly to the left of the contact’s display name, and serves as a unique identifier for each contact in your list.

![]() Appearance of Module Tags
Appearance of Module Tags
Not all modules that are tagged to the contact are shown on the Person List. If a contact shares the same module as you, the module tag corresponding to that module will appear for that contact on the Person List.

Meet Up Recommendation Panel
The Meet Up Recommendation Panel (located at the top right of EduMate) suggests recommendations of optimal timings and locations where you can meet your friends.

![]() Components of Meet Up Recommendation Panel
Components of Meet Up Recommendation Panel
The panel, as shown below, contains all the recommended timings and locations for your meet ups.

Profile Panel
The Profile Panel allows you to display your own or your contact’s information.
The Profile Panel will display basic information such as:
- Name
- Phone number
- Email address
- Telegram Handle
- Nearest MRT station to home
- Modules taken in current NUS Semester
- Groups

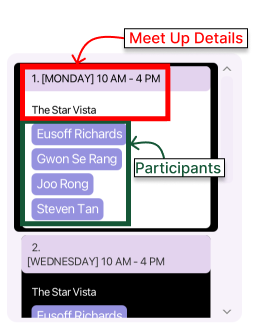
Scheduled Meet Up Panel
The Scheduled Meet Up Panel (located directly to the right of Profile Panel) will show your confirmed meetings with your contacts.

![]() Components of Scheduled Meet Up Panel
Components of Scheduled Meet Up Panel
The panel contains all the information of every scheduled meet up with your contacts as shown below.
Command Response Box
The Command Response Box is where EduMate will provide some feedback on the outcome of each command you execute (e.g. success, invalid format etc).
The Command Response Box is located directly below the Profile Panel and above the Command Box , and it is also scrollable for longer command feedback messages.
Command Box
The Command Box is where you can input the Commands when using EduMate.
The Command Box is located at the bottom of the application. You may refer to the User Interface section to locate it.
Did you know that the UP and DOWN arrow keys can be used to quickly access previously typed commands in the Command Box? You can now save time and increase your productivity!
EduMate saves up to 100 of your most recent commands to a file for your convenience when you relaunch the application as well! That way, you can reuse commands from your previous session with ease!
Help Button
Should you need help with command syntax whilst using EduMate, you may click the Help Button located at the bottom left of EduMate (see Breakdown of EduMate’s UI).
Clicking the Help Button is an alternative to the help command.
Both commands will result in a Help Window appearing which shows the various command syntax used by EduMate.

Exit Button
Clicking the Exit Button will allow you to quit EduMate.
Set Your Own Profile
Once you have familiarised yourself with EduMate, you are now ready to begin customising the application to suit your preferences and needs!
Step 1. Run java -jar edumate.jar. The application window will open and show you where you have left off
(if you have tried out sample from earlier)
Step 2. On the Command Box, execute edit n/[YOUR NAME] p/[YOUR CONTACT NUMBER] t/@[YOUR TELEGRAM HANDLE]
s/[NEAREST MRT STATION TO YOUR HOUSE] e/[YOUR EMAIL]
![]() To know more about what
To know more about what n/, e/ etc. symbolises, you may want to check out Prefixes.
You do not have to enter all your information at once! You can omit some information and its corresponding prefix and enter them in the future!
Moreover, EduMate will replace the missing fields with placeholders which you can then edit over later!
Step 3. To add the modules that you are studying as such :
tag m/[MODULE_CODE] DAY START_TIME END_TIME
E.g.
tag m/CS2103T MON 8 10 m/CS2101 WED 14 15
Step 4. To add groups that you currently belong to as such:
tag g/[GROUP_NAME]
E.g.
tag g/SoC g/Sailing
Step 5. You are done! Enjoy!
Commands
EduMate is a command-driven application, which means that its various functionalities can be accessed by executing specific commands.
How to interpret the command format
![]() Basic Command Format
Basic Command Format
-
The first word is the type of command that you are running.
e.g. for the commanddelete 5, we are running thedeletecommand. -
We use Prefixes like
p/andg/to label our arguments for the command. Additionally, we use numbers to specify the index of contacts in our list.
e.g.edit 2 n/Steven Tanruns theeditcommand with an index of 2 and ann/argument of Steven Tan. -
Words in
UPPER_CASEare arguments you are meant to fill in.
e.g. inview n/NAME, you can fill in theNAMEargument likeview n/Amirul Thani. -
We use
z/to denote any prefix.
e.g.z/FIELDcould meann/FIELDors/FIELD. -
Items in square brackets are optional.
e.g.n/NAME [g/GROUP]can be used asn/Amirul Thani g/Friendor asn/Amirul Thani. -
Items with
... after them can be used multiple times including zero times.
e.g.[m/MODULE]...can be used asm/,m/CS2108 m/CS2101etc. -
Unless otherwise specified, arguments can be in any order.
e.g. if the command specifiesn/NAME s/STATION,s/STATION n/NAMEis also acceptable. -
If an argument is expected only once in the command, but you specified it multiple times, only the last occurrence of the argument will be taken.
e.g.p/86544145 p/81353055will be interpreted asp/81353055. -
Unnecessary arguments will be ignored.
e.g.help 123will be interpreted ashelp.
![]() Invalid Command Formats
Invalid Command Formats
-
Indices must be positive numbers.
e.g.delete oneis not an accepted command. (Not a number)
e.g.delete -1is also not accepted. (Not positive) -
Prefixes must be preceded by a space.
e.g.sort m/an/Tanis not an accepted command for prefixesm/andn/. -
Commands and prefixes are CASE-SENSITIVE.
![]() General format of commands:
General format of commands:

- Bolded portions of the command format implies that inputs are optional.
Attributes
Contacts in EduMate have two types of attributes: single-valued and multi-valued.
Single-valued attributes for each contact can only have one value. Examples of single-valued attributes include a contact’s name, phone number, email address, Telegram handle, and home station.
Multi-valued attributes, on the other hand, can have multiple values associated with a single contact. Examples of multi-valued attributes include the groups and modules that a contact belongs to.
Basic Attributes
Below, you can find the basic attributes we use to make up a person’s profile in EduMate.
Basic Attributes Table
| Attribute | Description | Format | Rules | Example |
|---|---|---|---|---|
| Name | The name of the person. | n/NAME |
- Only contain alphanumeric characters and spaces. - Must also be unique. |
n/Wen Li |
| Phone Number | The phone number of the person. | p/PHONE_NUMBER |
- Should only contain numbers. - At least 3 digits long. Maximum of 15 digits allowed. |
p/89229358 |
| Email Address | The email address of the person. | e/EMAIL |
Should be of the form local@domain, where:- local consists of only alphanumeric and the special characters +, _, ., -.- domain consists of an @ symbol followed by website. |
e/wenli@gmail.com |
| Home Station | The name of the closest MRT station to the person’s home. | s/STATION |
Name of a valid MRT station. | s/Boon Lay |
| Telegram Handle | The Telegram Handle of the person. | t/TELEGRAM |
- Should start with @ symbol - At least 5 characters long - Only combinations of letters, numbers and underscores are allowed after the @ symbol |
t/@wenli |
Other Attributes
Below are some special attributes that complement the Basic Attributes of a person’s profile.
Group
Description: The group that you and the person belong to.
Pattern: g/GROUP
Rules: GROUP should only contain alphanumeric characters.
Example: g/Groupmate
Module
Description: The name of the module the person is taking.
Pattern: m/MODULE
Rules: MODULE should be the name of a valid NUS module.
Example: m/CS2107
![]() Important!
Important!
- EduMate’s Person List will only show common modules that you are enrolled in with the contact. Do not be alarmed that some modules you tagged did not appear in the Person List.
- You may still view the label when you view the contact’s profile.
- When you tag (untag) a module common to you to (from) a contact, it will appear (disappear) on the person’s contact card in the Person List automatically.
Module with Lessons
Description: The name of the module the person is taking, and a lesson associated with the module.
Pattern: m/MODULE DAY START_TIME END_TIME
Rules: MODULE should be the name of a valid NUS module. DAY should be a valid weekday of the week. START_TIME and END_TIME should be valid hour in a day.
Example: m/CS1234 mon 12 13
Basic Commands
These commands will help you to perform basic functions on EduMate. These are functions that will be expected to be present in a typical address book.
Add a contact add
You can easily add a new contact to EduMate using the add command. This allows you to quickly store their information for future reference, such as their name, phone number, email address, Telegram handle, and the closest MRT station to their home.
Once all the basic information has been added, you can then assign them to groups or modules using the tag command.
![]() Format (See Interpreting Command Formats):
Format (See Interpreting Command Formats):
-
add n/NAME [z/FIELD]...: Adds a contact with the given details. Notice thatNAMEis a compulsory field.
Scenario:
You want to create a new contact for a friend named Weixiang whose information does not exist in EduMate yet.
You run the add command with his details following the above format.
Command entered: add n/Weixiang p/89229358 s/Boon Lay e/heavenlywang@gmail.com t/@wangkong g/Groupmate m/CS2101 m/ES2660
What you should see:
- Weixiang’s contact is added towards the end of the Person List.
- Weixiang’s profile appears on the Profile Panel as such (below).
- The Command Response Box shows that Weixiang is successfully added into EduMate.

More Examples of Usage:
![]() Example 1 : All fields are present
Example 1 : All fields are present
-
add n/Zen Li p/89229358 s/Boon Lay e/zenli@gmail.com t/@zenli g/Groupmate m/CS2101 m/CS2107: Adds a contact with the following details:- Name:
Zen Li - Phone number:
89229358 - Station:
Boon Lay - Email:
zenli@gmail.com - Telegram handle:
@zenli - Groups:
Groupmate - Modules:
CS2101,CS2107
- Name:
![]() Example 2 : Some fields are present
Example 2 : Some fields are present
-
add n/Zen Qing: Adds a contact with the following details. Note the default values for each attribute:- Name:
Zen Qing - Phone number:
00000000 - Station:
Kent Ridge - Email:
zenqing@gmail.com - Telegram handle:
@zenqing00000 - Groups: Empty
- Modules: Empty
- Name:
As you may have already see above, when adding a contact with some fields present, EduMate will give placeholders for the respective missing information.
Notice that for
Telegram handle, there are 5 ‘0’s appended at the back of the name (E.g. Zen Qing results in @zenqing0000).
This is done to conform to Telegram’s username restrictions of being at least 5 characters long for short names like Bob, Sam etc.
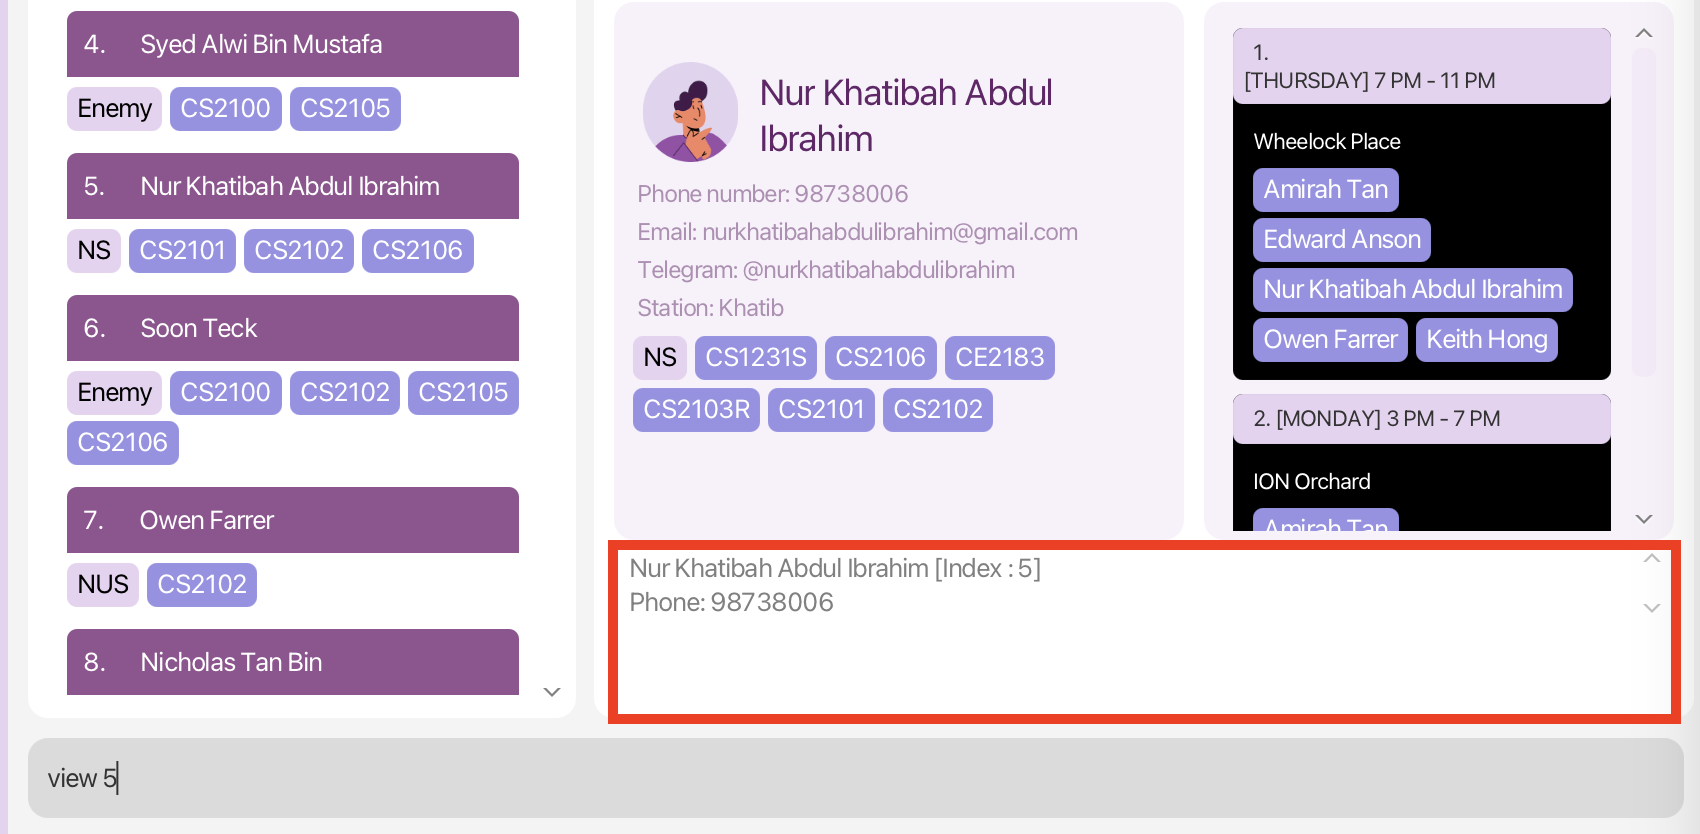
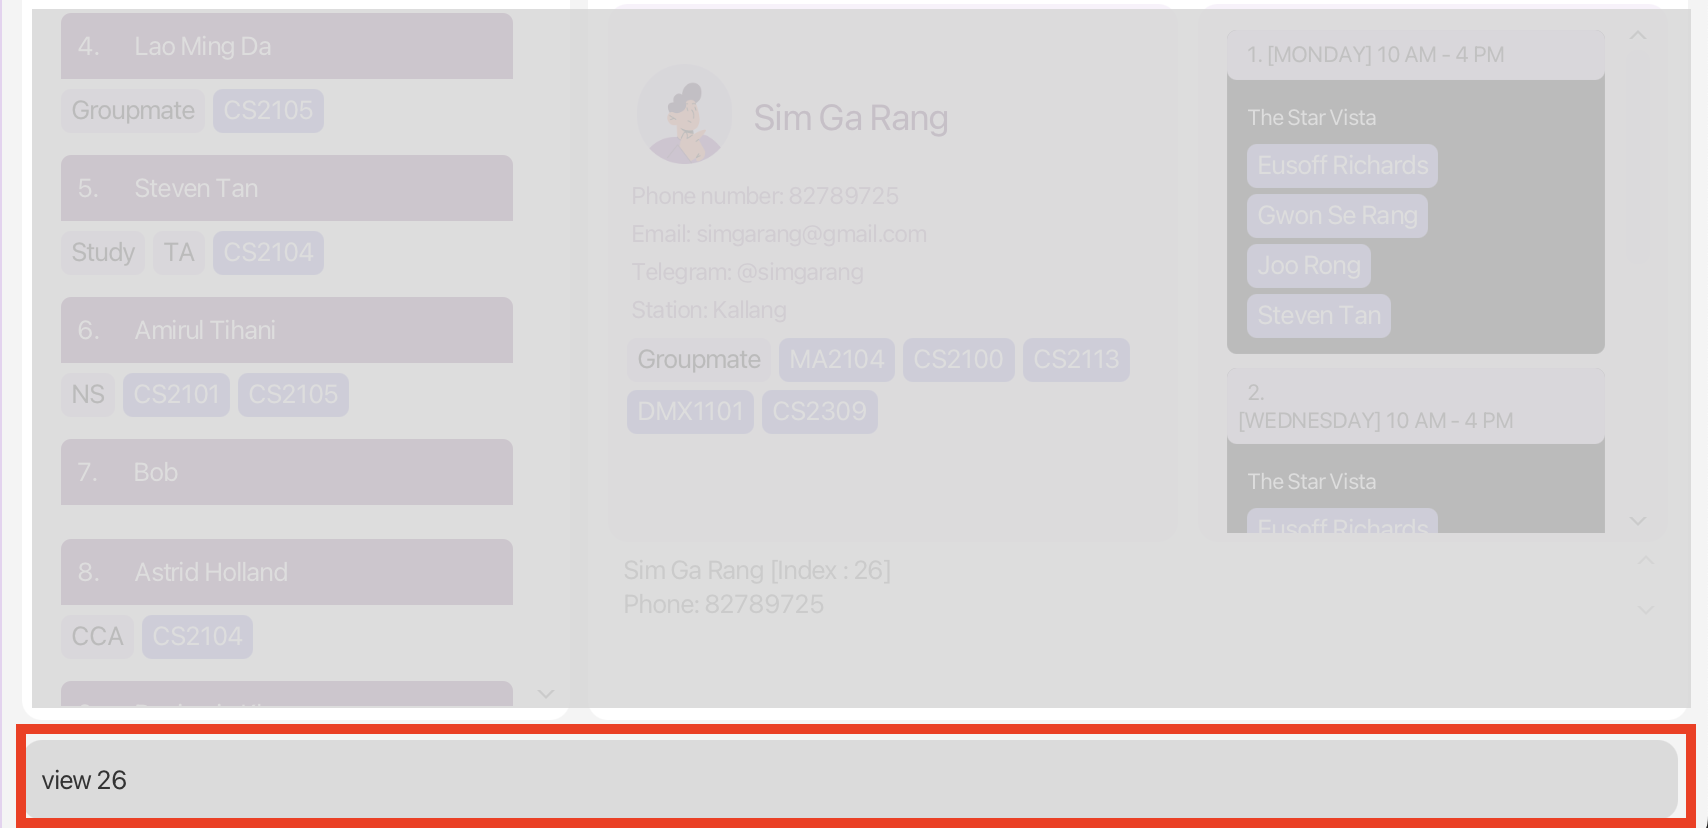
View a contact’s profile view
You can use the view command to retrieve and view either your own information or a contact’s information. This will display the relevant details on the Profile Panel.
![]() You can use this command if:
You can use this command if:
- you want to view a contact’s full details on the Profile Panel.
- you are unsure what index to use for a particular contact
The view command retrieves and display the either your profile or the contact’s profile on the Profile Panel.
![]() Formats (See Interpreting Command Formats):
Formats (See Interpreting Command Formats):
-
view: Views your profile. -
view INDEX: Views the contact at indexINDEX. -
view n/FULL_NAME: Views the contact with contact’s full nameFULL_NAME.
Scenario (Continuation from previous scenario):
Since Weixiang is a new friend, you want to reach out to him to get to know him better. You want to chat with him on Telegram but
cannot remember his Telegram handle. You decided to use the view command to view his profile.
Command entered: view n/Weixiang or view 101 (if you know Weixiang’s contact index)
What you should see:

view commandMore Examples of Usage:
![]() Examples
Examples
-
view: Displays your profile. -
view 5: Displays the profile of the fifth contact in EduMate. -
view n/Wen Li: Displays Wen Li’s profile.
Edit a contact’s details edit
With EduMate’s edit command, you can easily update the profile of a contact. You have the flexibility to modify as many fields as required, ensuring that your contact’s information is always up-to-date.
![]() Formats (See Interpreting Command Formats):
Formats (See Interpreting Command Formats):
-
edit INDEX [z/FIELD]...: Edits the fields for the contact at indexINDEX. -
edit [z/FIELD]...: Edits your user profile.
Scenario (Continuation from previous scenario):
Suppose now after talking to Weixiang, you realised that he has just moved to Little India. You then decide to edit the Station attribute of his contact from
Boon Lay to Little India. You also remembered that from the view command, Weixiang’s index in EduMate is 101.
Command entered: edit 101 s/Little India
What you should see:

edit commandMore Examples of Usage:
![]() Examples
Examples
-
edit 3 n/Zen Qing: Changes the name of the third contact toZen Qing. -
edit 6 p/89229358 t/@zenqing: Changes the phone number and telegram handle of the sixth contact. -
edit s/Bedok: Updates your nearest MRT station toBedok.
Delete a contact delete
If you no longer need a contact in EduMate, you can remove them using the delete command.
![]() Formats (See Interpreting Command Formats):
Formats (See Interpreting Command Formats):
-
delete INDEX: Deletes the contact at indexINDEX.
Scenario :
Suppose you do not need Astrid’s contact anymore and you want to delete her contact from EduMate.
From the view n/Astrid Holland command, her EduMate index is 8.
Command entered: delete 8
What you should see:

delete commandMore Examples of Usage:
![]() Example
Example
-
delete 5: Removes the fifth contact from EduMate.
![]() Deleting your own profile
Deleting your own profile
You cannot delete your own profile.
Add a label to a contact tag
You can tag your existing contacts with groups and modules using this command. You can also assign lessons to the contacts to indicate their availability during specific time periods. This will enable EduMate to suggest more suitable meet up times when using the meet command.
![]() Formats (See Interpreting Command Formats):
Formats (See Interpreting Command Formats):
tag m/MODULE_TAGtag m/MODULE_TAG DAY START ENDtag INDEX m/MODULE_TAGtag INDEX m/MODULE_TAG DAY START ENDtag g/GROUPtag INDEX g/GROUP
Scenario:
Suppose you now have a senior, Amirul, taking MA2101. You are interested and might want to contact Amirul for some advice.
You then tag Amirul’s contact in EduMate with the following Monday 4pm - 6pm lesson slot and its corresponding module code.
Amirul has index 6 in EduMate.
Command entered: tag 6 m/MA2101 Monday 16 18
What you should see:

More Examples of Usage:
![]() Module Tag Examples
Module Tag Examples
-
tag 1 m/CS1234: Adds CS1234 tag to the first contact from EduMate. -
tag m/CS1234: Adds CS1234 tag to your own profile. -
tag 2 m/CS2103T MONDAY 8 10: Adds CS2103T tag (if not present yet) to your second contact with a Monday lesson from 8am - 10am. -
tag m/CS2103T MONDAY 8 10: Adds CS2103T tag (if not present yet) to your profile with a Monday lesson from 8am - 10am.
![]() Group Tag Examples
Group Tag Examples
-
tag 1 g/Cycling: Adds Cycling tag to the first contact from EduMate. -
tag g/Project: Adds Project tag to your own profile.
Remove a label from a contact untag
With EduMate’s untag command, you can remove groups or modules from your existing contacts. Additionally, you can unassign lessons from a contact to indicate their availability during that specific period of time. This will help EduMate to suggest more appropriate meet up times when using the meet command.
![]() Formats (See Interpreting Command Formats):
Formats (See Interpreting Command Formats):
untag m/MODULE_TAGuntag m/MODULE_TAG DAY START ENDuntag INDEX m/MODULE_TAGuntag INDEX m/MODULE_TAG DAY START ENDuntag g/GROUPuntag INDEX g/GROUP
Scenario (Continuation from previous scenario):
You are now informed by Amirul that MA2101 is too hard and he has dropped the module. You then proceed to
untag that module from Amirul’s contact.
Command entered: untag 6 m/MA2101
What you should see:

More Examples of Usage:
![]() Module Tag Examples
Module Tag Examples
-
untag 1 m/CS1234: Removes CS1234 tag from the first contact from EduMate. -
untag m/CS1234: Removes CS1234 tag from your own profile. -
untag 2 m/CS2103T MONDAY 8 10: Removes CS2103T tag (if it exists) from your second contact with a Monday lesson from 8am - 10am. -
untag m/CS2103T MONDAY 8 10: Removes CS2103T tag (if it exists) from your profile with a Monday lesson from 8am - 10am.
![]() Group Tag Examples
Group Tag Examples
-
untag 1 g/Cycling: Removes Cycling tag (if it exists) from the first contact from EduMate. -
untag g/Project: Removes Project tag (if it exists) from your own profile.
Listing all your contacts list
With the list command, you can get EduMate to display all your contacts in the Person List
![]() Format (See Interpreting Command Formats):
Format (See Interpreting Command Formats):
list
![]() Tips:
Tips: list is especially useful when
- You need to view all contacts again after
findandsort. - Find out the index of the contact you want to view on the Person List.
Advanced Commands
Now that you have become familiar with the basics of EduMate, it’s time to explore its more advanced features. For a more guided experience, you can run the sample 100 command to navigate through this section.
Search Commands
The search commands in EduMate help you to efficiently navigate and manage your contacts. Instead of manually searching through a long list of contacts, these commands allow you to customise how EduMate displays them, making the process much more efficient.
Filter contacts by keywords find
EduMate’s find command helps you quickly locate specific contacts by searching for keywords within their fields. This tool allows you to generate a list of contacts that meet certain criteria and manage your contacts more efficiently.
To use the find command, simply type find followed by the relevant keywords or criteria.
The command can also be used with multiple prefixes to refine your search. The results returned will contain at least one keyword from each specified field. Use the find command to save time and easily locate the information you need.
![]() Format (See Interpreting Command Formats):
Format (See Interpreting Command Formats):
find z/KEYWORD [MORE_KEYWORDS]... z/KEYWORD [MORE_KEYWORDS]...
Scenario:
Say you want to filter out contacts who are in the same CCA as you to study for the upcoming finals for CS2100.
Command entered: find g/CCA m/CS2100
What you should see:

More Examples of Usage:
![]() Examples
Examples
-
find m/CS2103T CS2109S: Returns all persons with modules CS2103T or CS2109S -
find n/Edward Richards: Returns all persons with names Edward or Richards -
find p/9093: Returns all persons with phone numbers that contain 9093 -
find n/Edward m/CS2103T: Returns all persons with name Edward and module CS2103T -
find n/Edward Richards m/CS2103T CS2109S: Returns all persons named Edward or Richards with module CS2103T or CS2109S.
![]() Tips on usage
Tips on usage
- The search is case-insensitive. e.g. hans will match Hans
- The order of the keywords does not matter. e.g. Hans Bo will match Bo Hans
- Only the field specified by the prefix is searched. e.g. n/ means only the name field is searched
- Words matching the first part of the string will be matched e.g. Han will match Hans
- Persons matching at least one keyword will be returned (i.e. OR search). e.g. Hans Bo will return Hans Gruber, Bo Yang
![]() Filtered list
Filtered list
- The
findcommand returns a filtered list, so any contacts present in the filtered list will be unaffected by commands that have the capability to modify a contact’s information.
e.g. If the filtered list does not contain any person with contact index 2, any operation relating to contact index 2 will throw an error. - If you want to run commands related to persons not in the filtered list, just run the
listcommand to obtain the full list of your contacts.
Arrange contacts based on criteria sort
With EduMate’s sort command, you have the power to organise your contacts in a way that’s most helpful for you. Whether you want to find out who shares the most modules with you or who’s likely to become a close friend this semester, the sort command can help you out.
By simply typing sort followed by the relevant criteria, you can sort your contacts by name, the number of shared modules, or any other specified field. This feature can help you identify potential study or social groups within your contacts, making it easier to connect and collaborate with others.
![]() Formats (See Interpreting Command Formats):
Formats (See Interpreting Command Formats):
-
sort: Sorts the contacts by their indices. -
sort z/a: Sorts the contacts by theirzattribute in ascending order -
sort z/d: Sorts the contacts by theirzattribute in descending order -
sort z/: Sorts the contacts by theirzattribute based on our default ordering -
sort z1/ z2/: Sorts the contacts by theirz1attribute, and breaks ties using theirz2attribute -
sort [z/]...: Sorts the contacts by multiple attributes
![]() Accepted versions for
Accepted versions for sort order:
In short, in the command formats z/a and z/d, we only care about the first letter immediately after the slash. It can be either in upper case or lower case and can have anything behind it. For example, z/ascending and z/Disco would both work. However, if the first letter is not either a, d, D or A, then we use the default ordering.
We will now teach you how to effectively use the sort command.
![]() How the attributes are sorted:
How the attributes are sorted:
- The
NAME,EMAIL,STATION,PHONEandTELEGRAMattributes are sorted by alphabetical order, and is default in ascending order. - For
GROUP, we sort the contacts based on the number of groups the contact belongs to. By default, we sort in descending order.
e.g. if Alex has 2 groups (TA, NS), and Ben has one group (TA), Alex will be placed before Ben in the default ordering. - For
MODULE, we sort the contacts based on the number of common modules they share with you. By default, we sort in descending order.
e.g. if Alex has 2 modules (CS1101S, CS1231S), Ben has one module (CS1101S), and you have 2 modules (CS1231S, MA2001), then Alex has 1 module in common with you (CS1231S) and Ben has 0 modules in common with you. As such, Alex will be placed before Ben in the default ordering.
sort is one of the most complicated commands to get your head around. Perhaps a scenario can help you understand better!
Scenario (Continuation from previous scenario):
Suppose you want to arrange contacts such from those that take the most number of common modules with you to the least.
If there is a tie in the number of common modules shared with you, you decide to just rank the name lexicographically.
Command entered: sort m/d n/a
What you should see:

Extra Explanation:
The command sort m/d n/a would mean that EduMate would first sort contacts by decreasing number of common modules with you, and tie-break by its lexicographical ordering.
Hence, Alex Quinn is ranked higher than Amirul as Alex’s name is lexicographically smaller than Amirul even though they share the same number of common modules with you.
More Examples of Usage:
![]() Examples
Examples
-
sort n/d: Sorts by name in descending order -
sort m/a: Sorts by the number of modules they have in common with you (in ascending order) -
sort t/: Sorts by Telegram handle in its default ordering (ascending)
Storage Commands
The storage commands allow you to save and load your EduMate data into a file. This means you can easily backup your data and access it from different devices or share it with others.
![]() You can use these commands if:
You can use these commands if:
- You want to create backups of your EduMate
- You want to explore the functions of EduMate without fear of losing your data
- You want to maintain multiple versions of EduMate
Save a copy of EduMate save
Using the save command in EduMate, you can easily save your data into a file with a name of your choice. This allows you to back up your data and access it later or share it with others.
![]() Format (See Interpreting Command Formats):
Format (See Interpreting Command Formats):
-
save FILENAME: Saves the EduMate into a file atFILENAME.json. Note that the file name must be a non-empty, alphanumeric string.
![]() Examples
Examples
-
save backup: Saves the EduMate in thebackup.jsonfile.
Load a copy of EduMate load
Using the load command in EduMate, you can easily load a previously saved data file into the application. This allows you to access your data from different devices or recover it in case of data loss.
![]() Format (See Interpreting Command Formats):
Format (See Interpreting Command Formats):
-
load FILENAME: Loads the EduMate from a file atFILENAME.json. Note that the file name must be a non-empty, alphanumeric string.
![]() Examples
Examples
-
load backup: Loads the EduMate from thebackup.jsonfile.
Meet Commands
Suggest places to meet with your contacts meet, study, eat
The meet command in EduMate is used to suggest suitable meet-up locations and times for you and your contacts, based on various criteria such as availability and proximity. It is useful for finding a mutually convenient time and place to meet up with friends or study partners. EduMate also offers more specialised commands such as eat for suggesting places to eat and study for suggesting places to study.
![]() Format (See Interpreting Command Formats):
Format (See Interpreting Command Formats):
meet INDEX_1 INDEX_2 ...study INDEX_1 INDEX_2 ...eat INDEX_1 INDEX_2 ...
Scenario (Continuation from previous scenario):
After sorting your contacts, you decided to ask Tae Seong, Alex, Amirul and Kevin from your CCA to study for CS2100.
Problem is, you do not know when all of them are free! Luckily, you have EduMate to find out for you!
You can execute the study variant of the meet command
whilst referring to their index on the Person List.
From here, EduMate will recommend the most optimal places and the best possible time to meet and study for the final exam.
Command entered: study 35 29 10 23
What you should see:

More Examples of Usage:
![]() Examples
Examples
-
meet 12 32 8 4: Recommends some meeting times and locations for a potential meet up with friends with the following indices12, 32, 4, 8. -
eat 5 2 8 1 3: Recommends some meeting times and eating spots for friends with the following indices5, 2, 8, 1, 3 -
study 6 2: Recommends some meeting times and study spots for friends with the following indices6 and 2.
Schedule Commands
The organise command in EduMate is used to add meet ups with selected contacts, whether they are customised or recommended by the meet commands. The feature is useful for keeping track of your upcoming meet ups in an organised and efficient way.
In addition, EduMate offers the unorganise command, which helps you manage and clean up scheduled meet ups by removing them - making it easy to stay on top of your schedule.
Any organised meet ups will be displayed at EduMate’s Scheduled Meet Up Panel.
The American spellings,
organize and unorganize are not accepted by EduMate.
Organise a meet up organise
![]() Formats (See Interpreting Command Formats):
Formats (See Interpreting Command Formats):
organise INDEXorganise INDEX_1 INDEX_2 ... d/DAY T/START_TIME END_TIME l/LOCATION
Scenario (Continuation from previous scenario):
You have decided that Queenstown Public Library is the most conducive library and have confirmed with your friends the meeting time recommended by EduMate.
The recommendation index given by EduMate for your preferred meet up is 2.
Command entered: organise 2
What you should see:

More Examples of Usage:
![]() Example 1 : Adding a meet up from the recommendation list
Example 1 : Adding a meet up from the recommendation list
-
organise 1: Adds the recommendation with index 1 on the Meet Up Recommendation Panel to the Scheduled Meet Up Panel.
![]() Example 2 : Adding a customised meet up
Example 2 : Adding a customised meet up
-
organise 1 3 d/TUESDAY T/10 11 l/Starbucks: Adds a customised meet up with the following details to the Scheduled Meet Up Panel:- Participants:
contacts with index 1 and 3 - Day:
TUESDAY - Start time:
10AM - End time:
11AM - Location:
Starbucks
- Participants:
Unorganise a meet up unorganise
If you wish to remove a scheduled meet up from your Scheduled Meet Up Panel, simply use the unorganise command.
![]() Format (See Interpreting Command Formats):
Format (See Interpreting Command Formats):
unorganise INDEX
Scenario (Continuation from previous scenario):
Suppose Tae Seong cannot attend the meet up due to contracting Covid-19, and you have to cancel the scheduled meet up.
The scheduled meet up has the index 1 on the Scheduled Meet Up Panel.
Command entered: unorganise 1
What you should see:

Other Commands
Sample some contacts sample
![]() Format (See Interpreting Command Formats):
Format (See Interpreting Command Formats):
sample NUMBER_OF_CONTACTS
This command was built to help you and other new users get acquainted with EduMate’s functions.
sample helps to populate EduMate with fake profiles, so you can experiment with the commands without affecting your real contacts.
sampleYou can only sample at most 100 contacts into EduMate.
Do not execute
sample after you have started using EduMate properly yourself. Doing so will clear all your contacts!
Examples of Usage:
![]() Examples
Examples
-
sample 25: Randomly sample 25 contacts from within EduMate and populate them into the application.
Clear the application clear
If you want to delete all your contacts from EduMate, simply type clear.
After the
clear command is executed, the data that has been deleted will not be recoverable.
Exit the application exit
If you want to quit the application, simply type exit, or click on the Exit button located on the left of the interface.
FAQ
Q: Can I add multiple module tags to a user?
A: Yes, you can add multiple tags to a single user by using the “Module Tagging” feature multiple times.
Q: Can I edit my own profile?
A: Yes you may! Refer to Editing a Contact’s Details
Q: How is EduMate better than Microsoft Outlook or uWave?
A: We have features that Microsoft Outlook or uWave don’t have but we think should be integrated into these platforms, like the meet up recommenders and several search functions like sort and find. It is also open-source so student developers can suggest new features, and it is easily extensible!
Q: What is the difference between tag and edit feature when it comes to tagging groups and modules?
A: When you edit a profile with the m/ prefix, the existing modules of the person gets entirely deleted and the new module is added. tag however, just adds the module for you without modifying other existing tags. The same explanation could be applied to untag as well.
Summary
Prefixes
| Prefix | Representation |
|---|---|
n/ |
Name |
s/ |
Station |
p/ |
Telegram Handle |
e/ |
|
g/ |
Group |
m/ |
Module |
d/ |
Day |
l/ |
Location |
T/ |
Time Period |
|
Empty |
Command Summary
| Action | Format (See Interpreting Command Formats) | Examples |
|---|---|---|
| Add a contact | add n/NAME p/PHONE... |
add n/Wen Li... |
| View a profile |
view, view INDEX, view n/NAME
|
view 5, view n/Wen Li
|
| Edit a contact |
edit INDEX [z/FIELD]..., edit [z/FIELD]...
|
edit 4 n/Wen Qing, edit s/NUS t/@wenqing
|
| Delete a contact | delete INDEX |
delete 3 |
| Tag a contact |
tag INDEX m/MODULE..., tag m/MODULE..., tag INDEX g/GROUP, tag g/GROUP
|
tag m/CS1234, tag m/CS2345 mon 12 1, tag 1 g/Friend
|
| Untag a contact |
untag INDEX m/MODULE..., untag m/MODULE..., untag INDEX g/GROUP, untag g/GROUP
|
untag m/CS1234, untag m/CS2345 mon 12 1, untag 1 g/Friend
|
| Filter contacts | find z/FIELD... z/FIELD... |
find n/Tan, find m/CS1231, find n/Tan m/CS1231
|
| Sort contacts |
sort [z/a]..., sort [z/d]..., sort [z/]...
|
sort, sort n/a, sort m/ p/d
|
| Save a copy | save FILE_NAME |
save backup |
| Load a copy | load FILE_NAME |
load backup |
| Suggest meet ups |
meet [INDEX]..., eat [INDEX]..., study [INDEX]...
|
meet 1 6 4, eat 10 4 7
|
| Organise a meet up |
organise INDEX, organise [INDEX]... d/DAY T/START_TIME END_TIME l/LOCATION
|
organise 1, organise 1 2 3 d/MONDAY T/10 12 l/NUS
|
| Unorganise a meet up | unorganise INDEX |
unorganise 1 |
Troubleshooting
How to check your Java version
For Windows Users
Step 1. Open up Command Prompt.
Step 2. Run the command java -version.
Step 3. Check the version number from the output.
For Mac and Linux Users
Step 1. Open up Terminal.
Step 2. Run the command java -version.
Step 3. Check the version number from the output.